Showing posts with label Culinary Prowess. Show all posts

Monday, September 3, 2012

Swiss Days and Scones


I grew up nestled beneath the majesty of Mount Timpanogos in the Wasatch Mountains. My father, grew up on the other side of that same mountain in a little farming town called Midway.  As a little girl we would spend weekends taking the 30 minute drive up the canyon to visit family and friends.  My dad would tell stories of the canyon, small towns, and the Legend of Timpanogos to help pass the "loooong" drive through the beautiful waterfall filled canyon. 


Every Labor Day Weekend, however, we'd make the trip for something special - Midway Swiss Days.


My maiden name is "Probst" - an unmistakable Swiss name.  The Probst's along with a handful of other Swiss families settled in the Heber Valley more than 125 years ago.  Swiss Days is a way to pay homage to their Swiss heritage.

I have such fond memories of Swiss Days.  The yodelers in Lederhosen.  The sound of the Alphorn in the parade. And, spending hours in the tennis courts filled with kids games and prizes.

However, the one thing that stands out the most to me are the Swiss Bratzeli's and Scones. It's worth making the trip, searching for a parking spot, and fighting the crowds for these two items ALONE!

Since I couldn't be in Midway for Swiss Days this year, I figured I'd make up a batch of Utah Scones to celebrate here in Texas.

Utah Scones/Swiss Taco
  • First start with your favorite basic bread recipe (here's one to get you started). 
  • Roll out dough, cut or shape and fry in vegetable oil until golden on both sides.
  • Serve with honey-butter and cinnamon/sugar.  So good!


In addition to the food and entertainment, the town square is filled to the brim with booths loaded with charming merchandise. I haven't been to Swiss Days for a couple of years now, but I thought I'd include a few pictures of some of the booths and merchandise from my last visit.


This is my cute dad standing by the white gazebo in the middle of town square. The bulk of the entertainment is performed in this little gazebo.  It was originally built on wheels for my grandfather's band - The Midway Swiss Band - and for years they would play as the gazebo was pulled in the Swiss Days Parade.


There is never a shortage of beautifully handcrafted items.  This booth was selling tutu's wrapped like cotton candy.

Maybe, hopefully, next year we will make it home for a visit. It's been so hot in Texas. I'm so longing for a reprieve from the heat and humidity. I'll admit I'm homesick for that cool breeze blowing out of the canyon, the soft green grass between my toes, and a chance to see a few fall leaves signaling autumn is at the doorstep. I can't wait to get a hot scone and share some memories with family while we enjoy a little of our Swiss heritage amongst the madness of the crowds and crafts.

If you ever find yourself in Utah over Labor Day weekend - head to Swiss Days, you'll love it.

Friday, July 13, 2012

This Little Piggy Had Roast Beef

Around here, we are in the throws of baby food.  The New Guy is mobile and HUNGRY. 

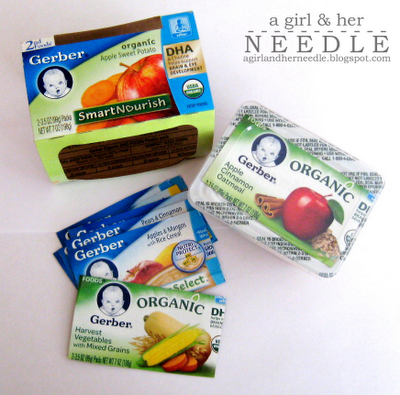
I don't know what it is about the label on the double pack of Gerber baby food that drives me crazy.  Once you remove one from the pack, the label either flaps around and gets in the way, or you toss it and you've then got to decipher the contents of the unlabeled food by the tiny stamped info on the side.

With my last baby I figured out this little system....


Once I remove and use one packet of the two-pack, I simply cut the label and insert it just under the lid. Then, when the baby's eaten that pack, save the cut label and use it the next time I purchase that same flavor.  

This is especially helpful for baby food to go.  When you're digging around in your diaper-bag, it's easy to see what food you've grabbed.

Let me say, this has been a SANITY SAVER for me!  Like I said, I really hate the labels floating around in my cupboard.  


I'll admit that if you like to see the labels when you open your cupboard, this is less than ideal.  However, I like to sort and stack my baby food according to each day.  That way The New Guy gets a variety of food to eat - and I don't have to spend any time thinking about what I have already fed him and what I'm going to feed him next.
 

These little plastic containers are great to re-use when they're emptied and cleaned.  Perfect size for kids snacks, earrings, rings, spices, kiddo knickknacks, etc.


Thursday, May 19, 2011

Mom's Homemade Bread

As a kid, I thought it was totally normal to come home from school to the smell of homemade bread. After all, didn't all moms make 10-12 loaves of bread a week? (We had a large family.)

My BFF and I would have tea parties using Kool-Aid, and hot out-of-the-oven, buttered, homemade bread. On a regular basis.

I was a lucky kid .

Now I'm a grown up with some Little Munchkins of my own and I realize what a feat it must have been for my mom to find time to make bread - especially those first 20 years (before she purchased her Bosch Mixer) and had to knead all that dough by hand.

I've adapted her recipe for my 5 quart Kitchen-Aid. Which makes two GIANT loaves.


Mom's Homemade Bread
1 Tbs. Active Dry Yeast (or 1 packet)
3 cups Warm Water
1/4 cup Granulated Sugar
1/4 cup Vegetable Oil
1 Egg
2-3 tsp. Salt
5-7 cups Unbleached All-Purpose Flour


Dissolve the Sugar into the Water and add the Yeast. Allow the Yeast a minute to activate and foam.

Combine with Oil, Egg, and Salt in Mixer (with Dough Hook). Start mixing on medium speed while adding flour one cup at a time. The amount of flour will vary depending on humidity, the size of your egg, how much liquid you have in your bowl, etc.


Mix/Knead on medium speed for about 10 minutes. Your dough should be soft, not to sticky, and start to form a ball around your dough hook.

Remove the hook from the dough, spray the top with non-stick spray, and cover with plastic wrap. Allow your dough to rise - double in size (about 30 min-1 hour depending on the temperature of your kitchen).

Once your dough has doubled in sized, punch it down and divide into two equal balls.


Spray the bottom of two glass bread pans w/ non-stick cooking spray and knead your dough into the pan pulling edges to the center. Flip dough over in pan for a nice smooth top. Cover with plastic wrap and let the dough double in size (again).


Pop these beauties in a 350 degree preheated oven for 35-40 minutes.


Let your loaves cool before cutting. I like to butter the top of my bread (mostly because that's what my mom did). I buttered these while they were really hot, making the butter bubble on top.


Without fail, every time I make bread, at some point I find a little nugget taken out of the loaf. It's nice to know that my Munchkin likes and appreciates homemade bread as much as I d0!

Enjoy!

Saturday, December 18, 2010

Chocolate Dipped Dreams

This week I've had some fun with this:


Dipping these:

And making a mess drizzling what was left over onto these:


Pin It

-----------------------------------------------------------------
The "deconstructed" White Chocolate Macadamia Nut Cookies are a fun change (I'm blaming Bravo for all the "deconstructing" on Top Chef).

Instead of mixing the nuts and chips into the cookie before baking. Dip the cookies after they've cooled in the White Chocolate and sprinkle with chopped Macadamia Nuts.

This cookie is like a little piece of heaven!

Find the basic cookie recipe here.

--------------------------------------------------------------
The Oreo Truffles were just as fun to make. There are a number of recipes out there (search Foodtv.com or Kraftfoods.com).

This recipe is SUPER EASY - I pulverized (literally) one bag of Oreo Cookies and mixed in 8 oz. of cream cheese. Formed 1 inch balls. Froze the balls on wax paper for about 45 minutes, then dipped them in melted semi-sweet chocolate and drizzled with my leftover white chocolate. Pop them back in the freezer for 30 min or until the chocolate is stiff enough to transfer to a mini baking cup.


Dipping tip: Place ball on a fork then spoon melted chocolate over the top of your truffle. Shake the fork until excess chocolate has dripped off. Use a clean spoon to help slide it off of fork onto wax paper.

Wednesday, November 3, 2010

Spiced Syrup

In spite of the fact that not a single Sycamore leaf has changed color, and the temperatures aren't supposed to dip below 70 degrees this week in sunny southern California - it still feels like fall.

Halloween is over and I've been indulging my craving for the aroma of spiced cider by mulling whole cloves, allspice berries, and cinnamon on my stove.

Even if it doesn't look or feel like fall, it smells like fall.

I though I'd share one of my favorite spice recipes. I love this syrup. We made it with apple juice and had it over baked french toast for dinner. Mmmm...


* Instead of using ground Cinnamon, Nutmeg, and Cloves - mull your fruit juice with a tea infuser or tied off cheese cloth filled with whole Allspice Berries, whole Cloves, broken up Cinnamon Sticks, and Orange Zest (or simplify and use the Williams Sonoma Mulling Spices).

Sunday, October 31, 2010

Ghost Cookies

One last Halloween Treat to share before this holiday is officially over until next year...

Ghosts Cookies!


They're a simple treat that took less time (and mess) to make than regular cookies.

Simply dip Nutter Butter Cookies in melted white chocolate and add mini-chocolate chips for eyes.


I finished mine with a thumb print pumpkin and individually wrapped them in treat bags.


It was super easy and fun! We made these for family night. I dipped, the Hubby dropped the eyes, and the Munchkin, well....he ate!

Happy Halloween!

Monday, November 10, 2008

White Choclate Macadamia Heaven


I owe this decadent cookie recipe to a 9 year old I used to babysit. He'd make these cookies and they were HEAVENLY. It was baffling to me that a little guy could make such culinary delights. I don't know where his recipe came from (probably off the back of the chocolate chip package for all I know). If you're interested here's the recipe and my tips:

Lane's Chocolate Chip Cookies
1 Cup Unsalted Butter (NOT Margarine)

1 Cup Granulated Sugar
3/4 Cup Packed Brown Sugar
2 Tsp. Vanilla
2 Eggs
1 Tsp. Baking Soda
3/4 Tsp. Salt
2 1/2 Cups (+ 2 to 4 heaping Tablespoons) Flour
16 oz. Chocolate Chips
1/4 to 1/2 Cup Nuts (optional)

Mix sugars and butter until creamy. Add eggs and vanilla and mix until fluffy. Mix together dry ingredients and add to creamed mixture 1/4 cup at a time. Texture should be sticky, but firm enough to roll into balls. Add chocolate chips and nuts. Bake at 350 degrees on an
un-greased cookie sheet for 10-13 minutes (depending on elevation and oven). Cool on wire rack.


My Tips:
  • Never melt your butter. It affects the texture of your cookie. Use soft, room temperature butter.
  • Once adding the eggs, beat the mixture until fluffy. It infuses air and improves the texture.
  • Adding more flour to the dough will make them more cakey, adding less will make them more flat. I like mine somewhere in between - not so sticky that I have to drop them with a spoon and not so firm that they won't flatten out on their own in the oven.
  • Milk chocolate is ALWAYS better than semi-sweet, and white chocolate and macadamia nuts are the best.

My "Kitchen-Aid" and my "Kitchen Aide"

Thursday, October 30, 2008

Test Kitchen - Pumpkin Pie


Sugar/Pie Pumpkin

Vs.


Cow Pumpkin


On a recent visit to a local farmer's market I learned that the "Cow Pumpkin" (white pumpkin above) is actually what canned pumpkin is made from. According to the farmer, it's "much sweeter, and has a better texture." Since I LOVE pumpkin pie, I decided to see if there really was much of a difference.

Preparation:


Cutting into the Pie Pumpkin was a NIGHTMARE! The skin was tough, and my knife kept getting stuck. The good news; it was small enough that I could steam the two halves and scoop out the "meat" without having to peel it. It also had the very familiar aroma of carved pumpkin.


The Cow Pumpkin was like cutting into a cantaloupe. It was soft, smooth, and cut up nicely. It was really juicy, and smelled really sweet too.


The puree had an obvious difference. The Pie Pumpkin (left) was lighter, more solid, and obviously yielded less because of the size of the pumpkin. The Cow Pumpkin (right) was darker, juicier (I had to strain this longer to remove excess water), and smelled much sweeter.


Baking:


Once mixed, they looked virtually identical. However, they did smell different, the Cow Pumpkin, smelled a little sweeter, and more traditional.


Finished!


I was REALLY excited about this part. I gave a test offering to my "better half" and he asked "where's the whip cream?" I guess he just wasn't into it as much as I was, however the results were unanimous.

The Cow Pumpkin had more of a custard texture (I'm guessing this is because of the amount of water in the puree), and it was slightly sweeter.

The Pie/Sugar Pumpkin was a little more solid, like a traditional pumpkin pie, and cooked up a little faster than the Cow Pumpkin.

All in all, they tasted virtually identical. If they weren't labeled, I wouldn't be able to tell them apart. So if you don't have access to a farmer's market, and you're only option is a Sugar Pumpkin, or even the pumpkin you carved for Halloween, don't worry, it'll taste just as good.

The moral of this story: Don't let a farmer tell you that a "Cow Pie" is just as good as a "Sugar Pie"!